UniFi OS コンソールの最上位機種 Ubiquiti UniFi Dream Machine Special Edition (UDM-SE) を使用する機会を得たので、現在使っている YAMAHA RTX1200 をUDM-SEに置き換えてみようと思います。RTX1200ではAWSと Site-to-Site VPN を構築していたので、静的ルーティングを使ってUDM-SEでも同様にAWSと Site-to-Site VPN を構成します。
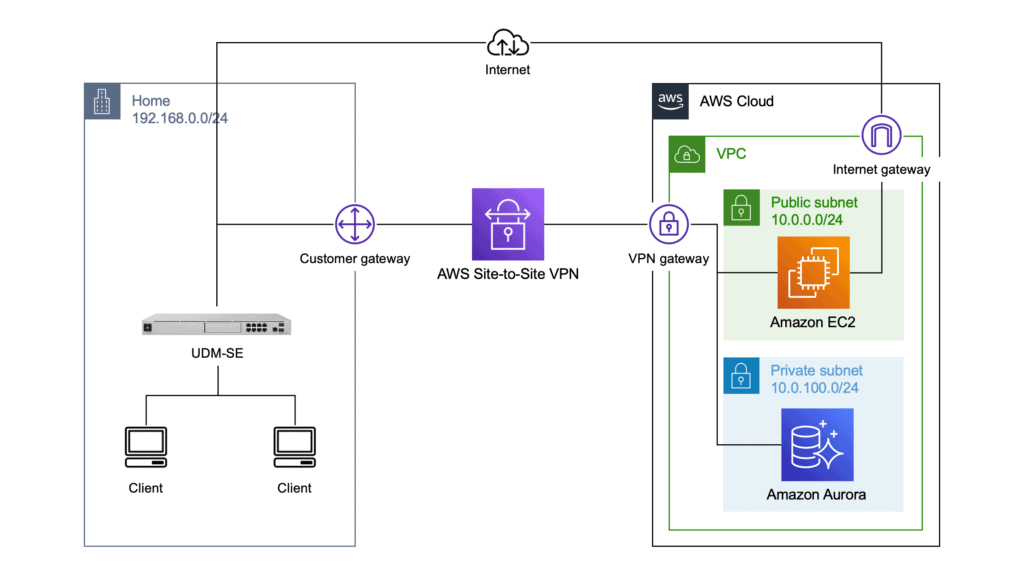
アーキテクチャ図は以下のようになり、自宅のグローバルIPアドレスを Customer gateway として定義し、VPC側に VPN gateway をアタッチし、その間で Site-to-Site VPN を構築します。VPN gateway には Public subnet だけでなく Private subnet にもつなぐことで、自宅のクライアントから Private subnet 内のデータベースにも直接アクセスできるようにします。
Customer gateway の作成
まずはAWS側の設定を行います。
- Amazon VPC コンソールにアクセス
- 左パネルから Customer gateways を選択
- Create customer gateway ボタンを選択
- Name tag に好きな名前を設定
- IP address に自宅のグローバルIPアドレスを入力
- Create customer gateway ボタンを選択
私はauひかりを使っているため、Home Gateway (HGW) のMACアドレスが変わらない限りグローバルIPアドレスは変更されないため、グローバルIPアドレスは変更されないものとして運用しています。グローバルIPアドレスがしばしば変更される環境の場合は、変更を何らかの方法で検知して、aws ec2 create-customer-gateway コマンドで新しいIPアドレスの Customer gateway を自動作成するようにする必要があるでしょう。
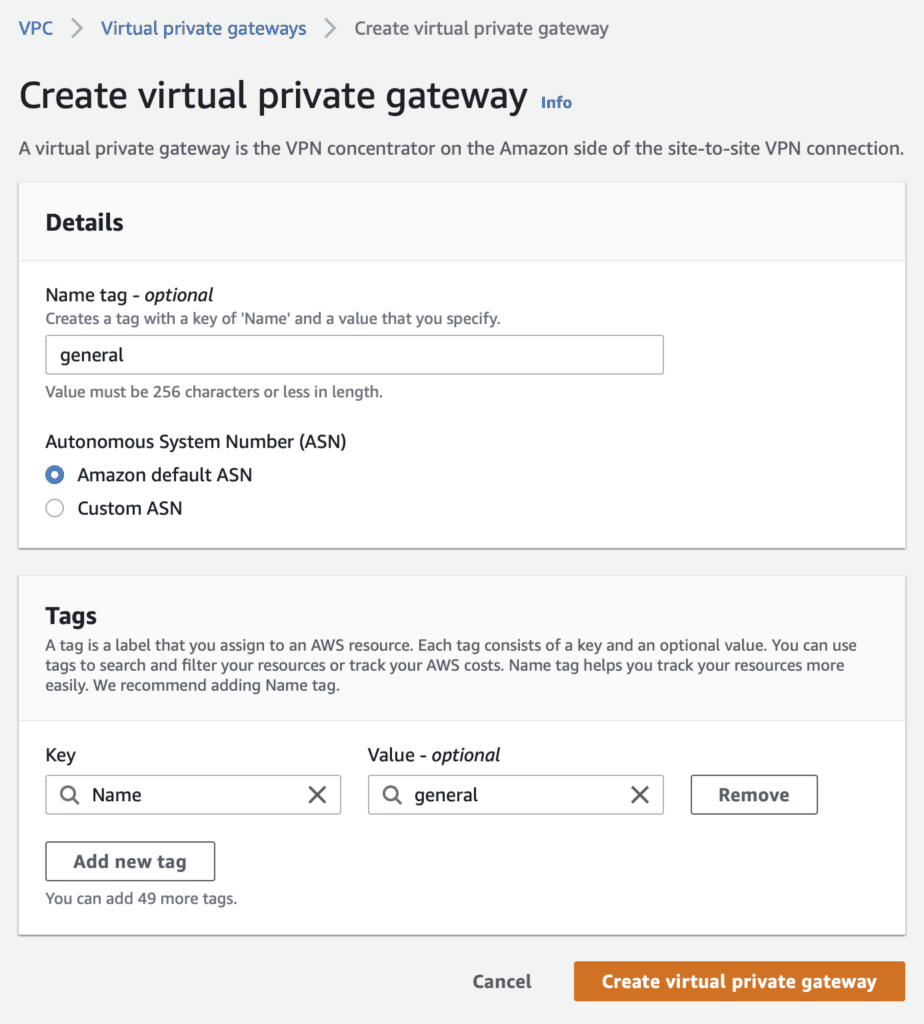
VPN gateway の作成
- Amazon VPC コンソールにアクセス
- 左パネルから Virtual priavte gateways を選択
- Create virtual private gateway ボタンを選択
- Name tag に好きな名前を設定
- Create virtal private gateway ボタンを選択
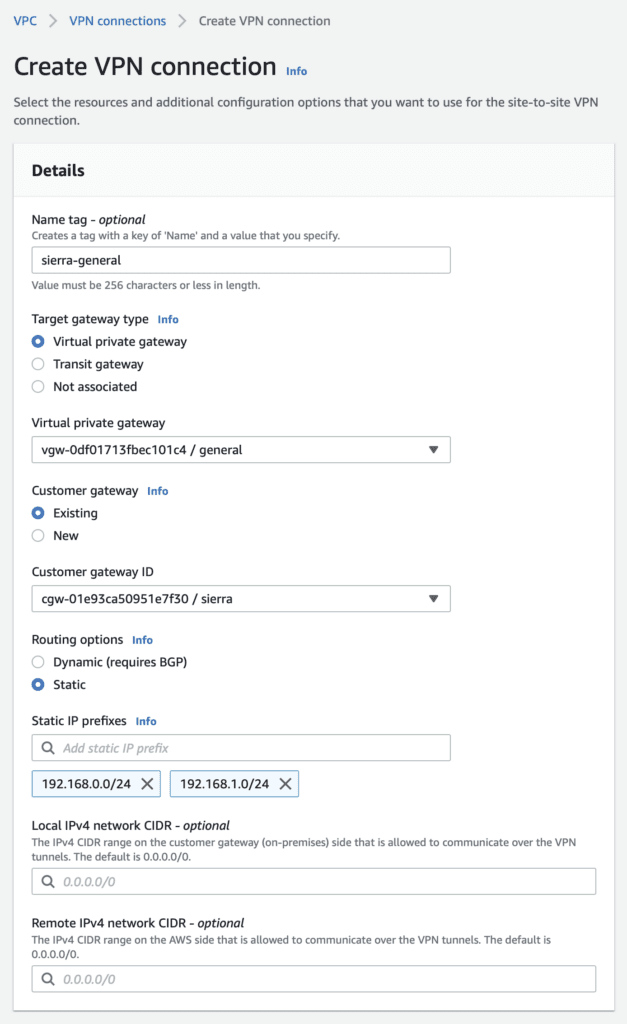
Site-to-Site VPN の作成
- Amazon VPC コンソールにアクセス
- 左パネルから Site-to-Site VPN connections を選択
- Create VPN connection ボタンを選択
- Name tag に好きな名前を設定
- Target gateway type で Virtual private gateway を選択
- Virtual private gateway で先ほど作成した VPN gateway を選択
- Customer gateway でExitingを選択
- Customer gateway ID で先ほど作成した Customer gateway を選択
- Routing options でStaticを選択
- Static IP prefixes に自宅のプライベートIPとサブネットを入力
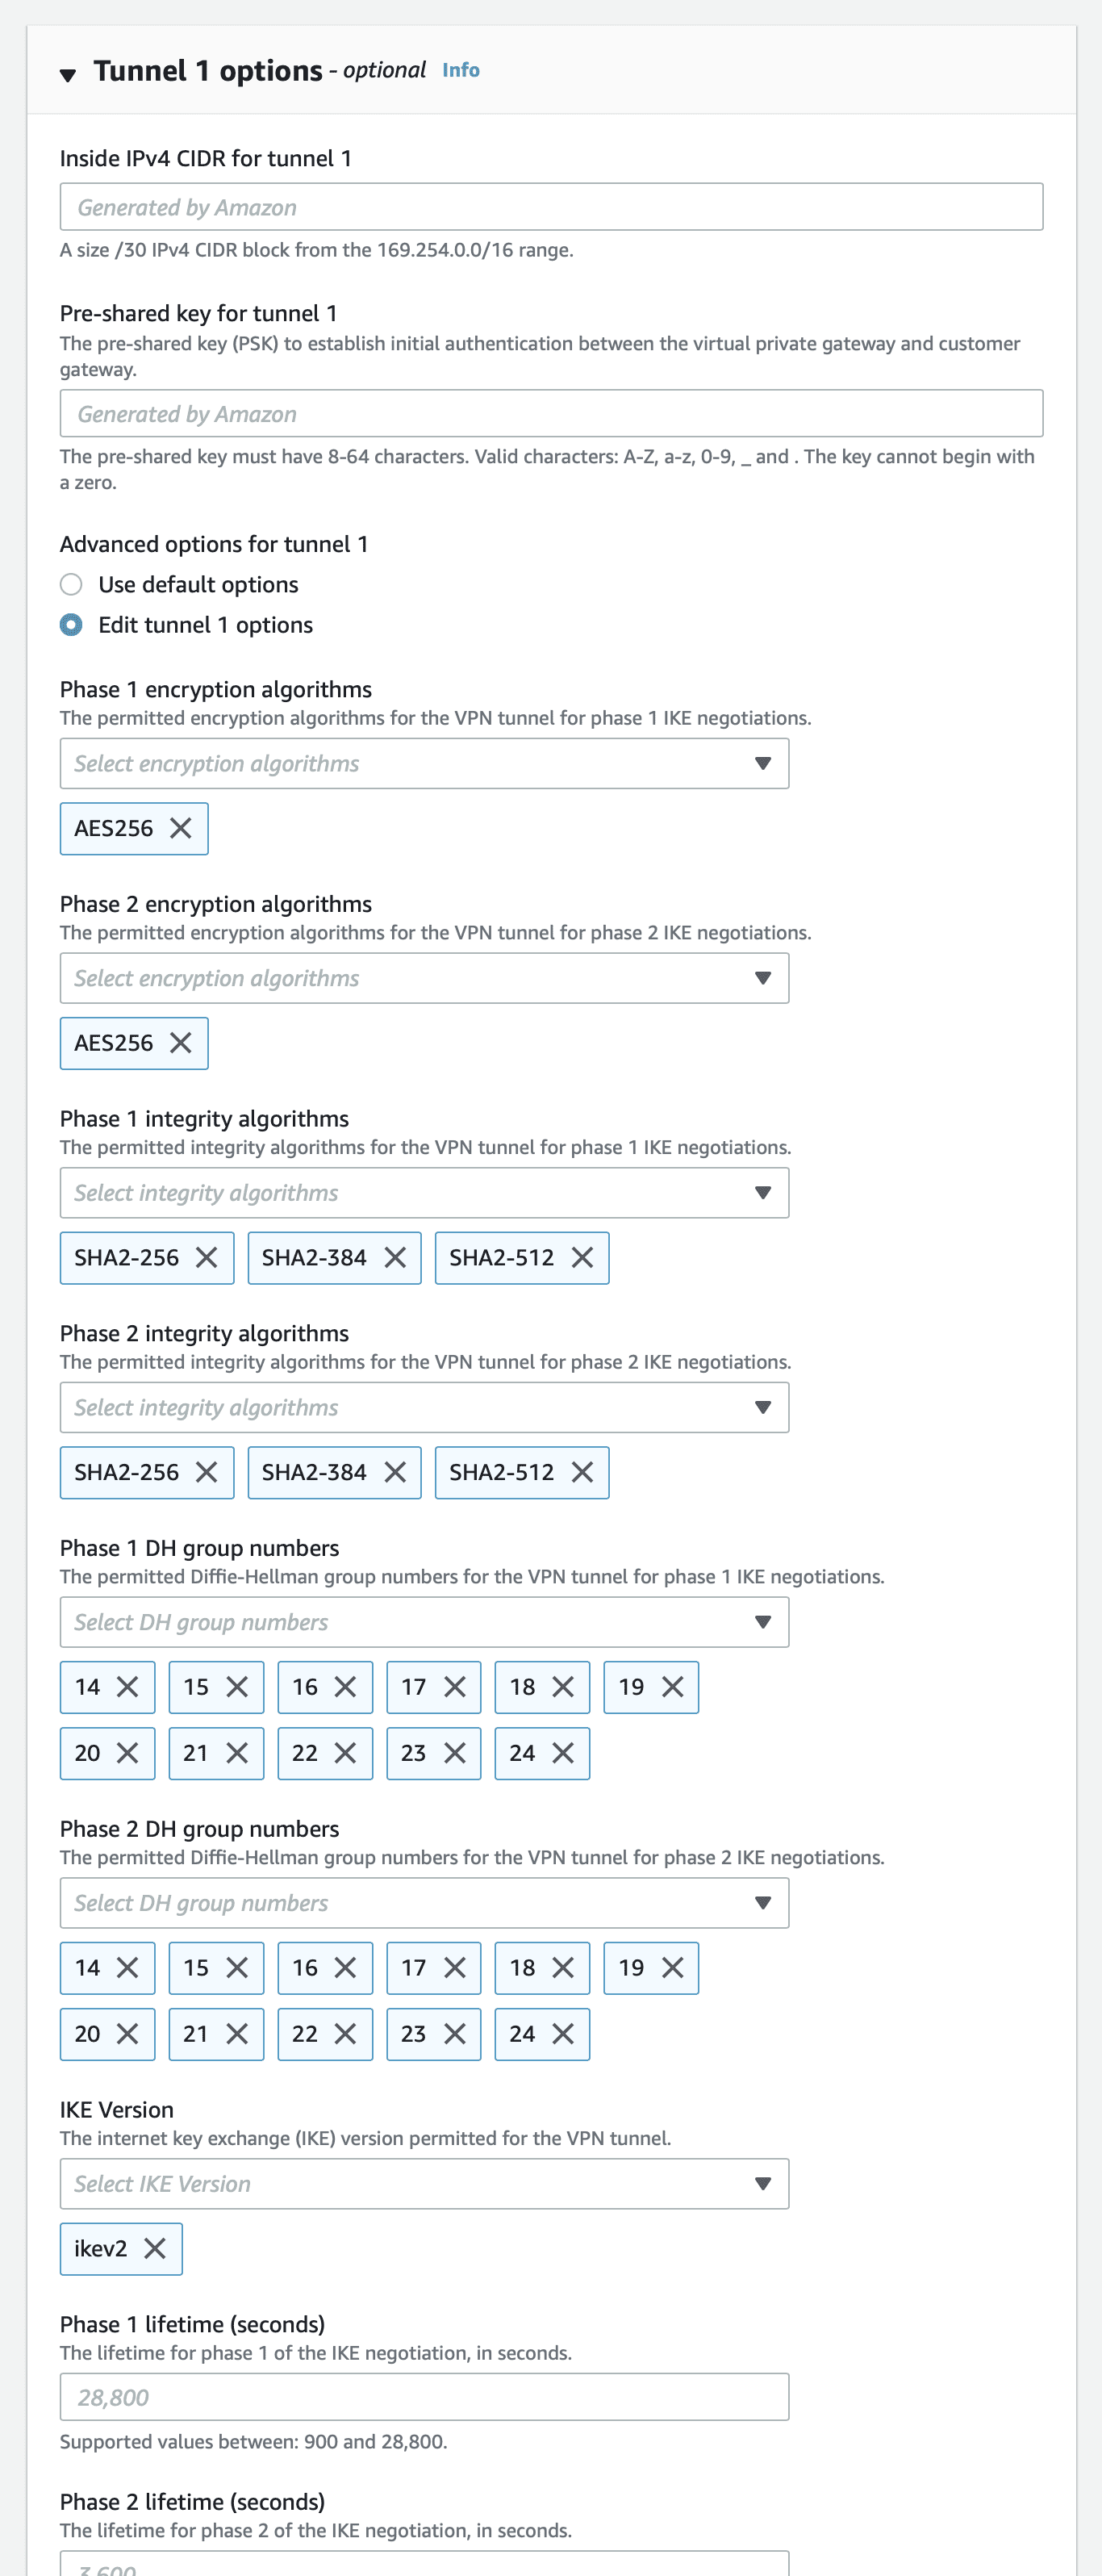
- Tunnel 1 options を開く
- Advanced options for tunnel 1 を Edit tunnel 1 options に変更
- Phase 1 encryption algorithms をAES256のみに変更
- Phase 2 encryption algorithms もAES256のみに変更
- Phase 1 integrity algorithms を SHA2-256, SHA2-384, SHA2-512 に変更
- Phase 2 integrity algorithms も SHA2-256, SHA2-384, SHA2-512 に変更
- Phase 1 DH group numbers を14以上に変更
- Phase 2 DH group numbers も14以上に変更
- IKE Version をikev2のみに変更
- Tunnel 2 options も Tunnel 1 options と同様に設定
- Create VPN connection ボタンを選択
- 作成した VPN connection を選んで、Download configuration ボタンを選択
- VenderでGenericを選択
- IKE version でikev2を選択
- Downloadボタンを選択
ダウンロードしたvpn-xxxxxxxxxxxxxxxxxx.txtというファイルは後で使用します。
グローバルIPアドレスがしばしば変更される環境のため Customer gateway を自動作成している場合は、aws ec2 modify-vpn-connection コマンドで Customer gateway を自動変更しましょう。
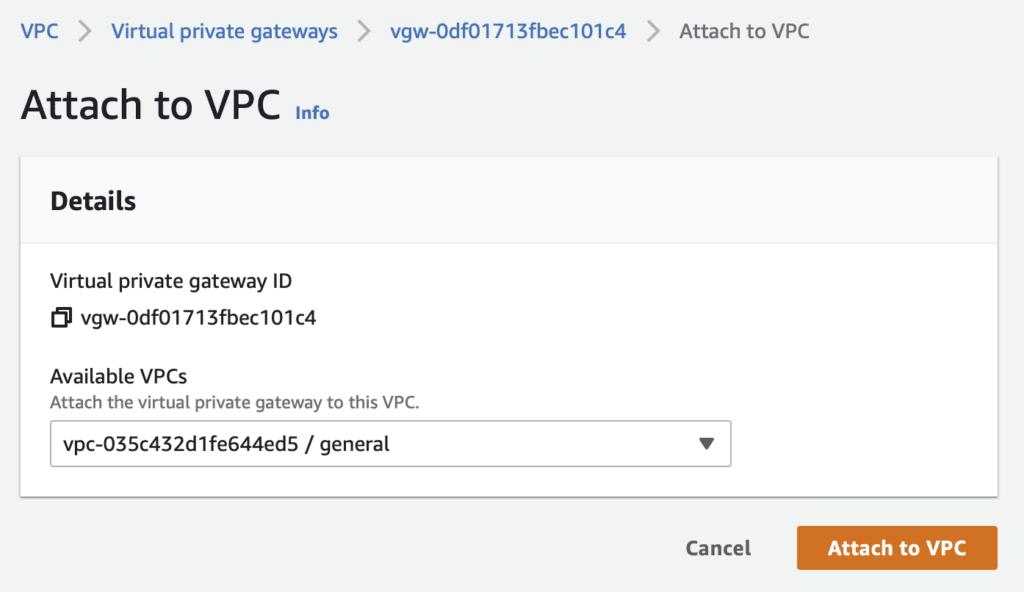
VPCに VPN gateway をアタッチ
- Amazon VPC コンソールにアクセス
- 左パネルから Virtual priavte gateways を選択
- 先ほど作成した VPN gateway を選択して、Actionsメニューから Attach to VPC を選択
- Availables VPCs からアタッチするVPCを選択
- Attach to VPC ボタンを選択
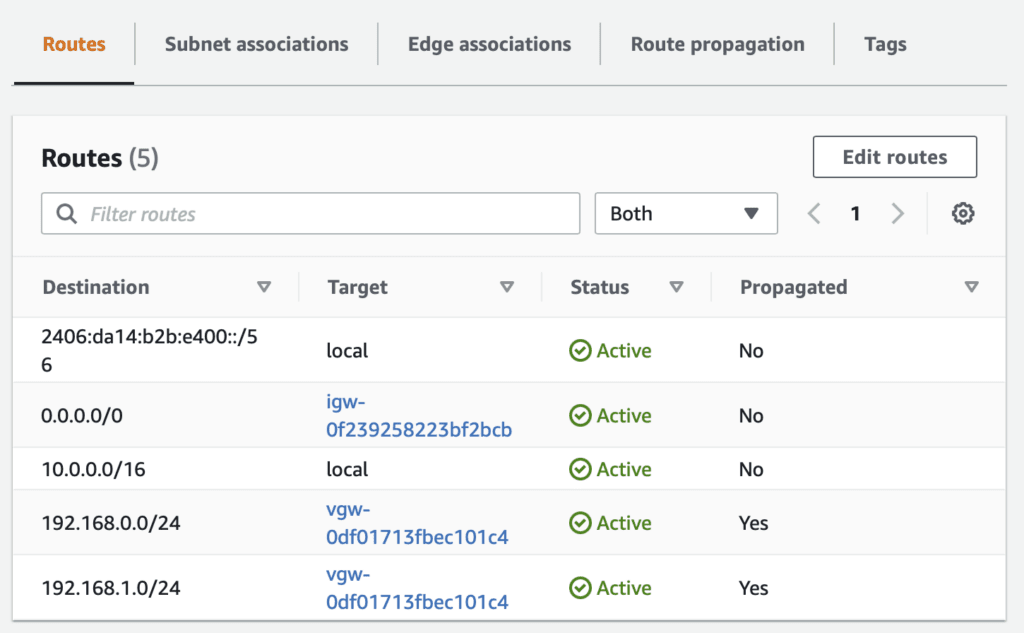
Route table の編集
自宅のプライベートIPアドレスが宛先の場合は Internet Gateway ではなく、VPN gateway に行くように Route table を編集します。
- Amazon VPC コンソールにアクセス
- 左パネルから Route tables を選択
- Public subnet で使用している Route table を選択して、Actionsメニューから Edit route prepagation を選択
- 先ほど作成した VPN gateway のEanbledをチェック
- Saveボタンを選択
- Route table を見て、自宅のプライベートIPアドレスが宛先の場合は VPN gateway が目標になっていることを確認
- Private subnet も Public subnet と同様に設定
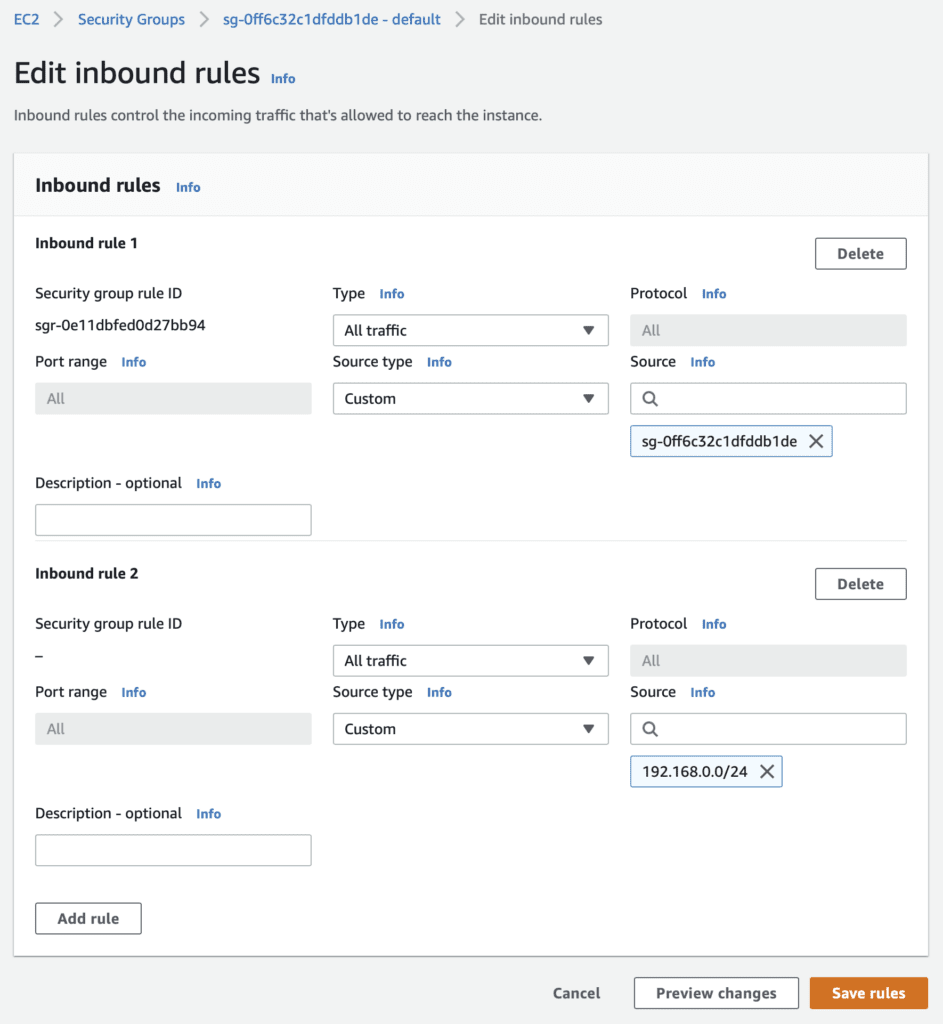
Security Group の編集
自宅のプライベートIPアドレスからのアクセスを許可するため、Security Group を編集します。以下ではすべてのインスタンスにすでにアタッチされている Security Group に追加しています。
- Amazon EC2 コンソールにアクセス
- 左パネルから Security Groups を選択
- すべてのインスタンスにすでにアタッチされている Security Group を選択して、Edit inbound rules を選択
- Add rule ボタンを選択
- Typeで All traffic を選択
- Source type でCustomを選択
- Sourceで自宅のプライベートIPとサブネットを入力
- Save rules ボタンを選択
AWS側の設定は以上です。
UDM-SEの設定
続いてUDM-SE側の設定を行います。
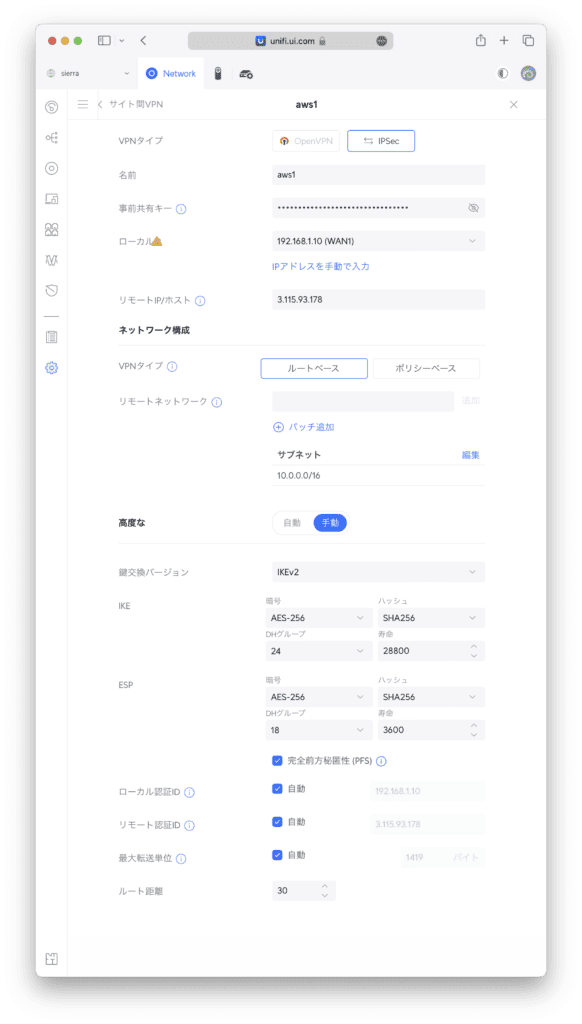
- https://unifi.ui.com/ にアクセス
- UniFi Network を選択
- 設定 > VPN を選択
- 〈サイト間 VPN〉の〈新しい作成〉を選択
- 〈VPNタイプ〉でIPSecを選択
- 〈名前〉に好きな名前を設定
- 〈事前共有キー〉に、ダウンロードしたvpn-xxxxxxxxxxxxxxxxxx.txtというファイルの36行目にある IPSec Tunnel #1 の Pre-Shared Key に記載されている32文字を入力
- 〈ローカルIP〉で使用するWANを選択
- 〈リモートIP/ホスト〉に、vpn-xxxxxxxxxxxxxxxxxx.txtの94行目にある IPSec Tunnel #1 の Virtual Private Gateway に記載されているグローバルIPアドレスを入力
- 〈VPNタイプ〉で〈ルートベース〉を選択
- 〈リモートネットワーク〉にVPCのプライベートIPとサブネットを入力
- 〈高度な〉を〈手動〉に変更
- 〈鍵交換バージョン〉でIKEv2を選択
- IKEの〈暗号〉でAES-256を選択
- IKEの〈ハッシュ〉でSHA256を選択
- IKEの〈DHグループ〉で24を選択
- ESPの〈暗号〉でAES-256を選択
- ESPの〈ハッシュ〉でSHA256を選択
- ESPの〈DHグループ〉で18を選択
- 〈追加〉ボタンを選択
AWS側は2個のトンネルを用意していますが、UDM-SEがBGPなどの動的ルーティングに対応していないため、同一宛先のものは1個ずつしか有効にすることができません。また、UDM-SEのサイト間VPNをコマンドラインから無効/有効にする方法が現状では分かっていないため、なにかあったら手動で切り替える必要があります。
- 〈管理〉を選択
- 上記で作成したVPNを選んで〈一時停止〉
- 〈新しい作成〉を選択
- 〈VPNタイプ〉でIPSecを選択
- 〈名前〉に好きな名前を設定
- 〈事前共有キー〉に、ダウンロードしたvpn-xxxxxxxxxxxxxxxxxx.txtというファイルの136行目にある IPSec Tunnel #2 の Pre-Shared Key に記載されている32文字を入力
- 〈ローカルIP〉で使用するWANを選択
- 〈リモートIP/ホスト〉に、vpn-xxxxxxxxxxxxxxxxxx.txtの194行目にある IPSec Tunnel #2 の Virtual Private Gateway に記載されているIPアドレスを入力
- 〈VPNタイプ〉で〈ルートベース〉を選択
- 〈リモートネットワーク〉にVPCのプライベートIPとサブネットを入力
- 〈高度な〉を〈手動〉に変更
- 〈鍵交換バージョン〉でIKEv2を選択
- IKEの〈暗号〉でAES-256を選択
- IKEの〈ハッシュ〉でSHA256を選択
- IKEの〈DHグループ〉で24を選択
- ESPの〈暗号〉でAES-256を選択
- ESPの〈ハッシュ〉でSHA256を選択
- ESPの〈DHグループ〉で18を選択
- 〈追加〉ボタンを選択
VPN疎通の確認
- Amazon VPC コンソールにアクセス
- 左パネルから Site-to-Site VPN connections を選択
- 上記で作成した VPN connection を選択
- 下パネルから Tunnel details タブを選択
- Tunnel Status の1個がUpになっていることを確認
UDM-SEで有効にしたトンネル側のみがUpになっている状態で正しいです。
宛先が Amazon EC2 の場合は、自宅のクライアントからEC2のプライベートIPアドレスにpingを実行してみましょう。
[tats@zoom ~]% ping 10.0.0.63 -c 3
PING 10.0.0.63 (10.0.0.63): 56 data bytes
64 bytes from 10.0.0.63: icmp_seq=0 ttl=63 time=6.621 ms
64 bytes from 10.0.0.63: icmp_seq=1 ttl=63 time=6.937 ms
64 bytes from 10.0.0.63: icmp_seq=2 ttl=63 time=6.829 ms

--- 10.0.0.63 ping statistics ---
3 packets transmitted, 3 packets received, 0.0% packet loss
round-trip min/avg/max/stddev = 6.621/6.796/6.937/0.131 ms
Amazon Aurora はpingに応答しないため、実際に接続してみましょう。Private subnet にあるAuroraに自宅のクライアントから直接ログインできるはずです。
[tats@zoom ~]% mysql -uexample -p -hexample.cluster-c8xun5aepybs.ap-northeast-1.rds.amazonaws.com example
Enter password:
Reading table information for completion of table and column names
You can turn off this feature to get a quicker startup with -A

Welcome to the MySQL monitor.  Commands end with ; or \g.
Your MySQL connection id is 129094
Server version: 8.0.23 Source distribution

Copyright (c) 2000, 2022, Oracle and/or its affiliates.

Oracle is a registered trademark of Oracle Corporation and/or its
affiliates. Other names may be trademarks of their respective
owners.

Type 'help;' or '\h' for help. Type '\c' to clear the current input statement.

mysql>
参考
How to setup AWS Site-to-Site VPN with Unifi UDM 🔒